Use Pay Now with Opayo (formerly Sage Pay)
Opayo is the new name for Sage Pay.
How to
Use Pay Now with statements
Sage 200 provides two different layouts for your email statements. However we only provide one layout with the Pay Now button. You can use the layout with either or both email statement options. The resulting statement will always be the same.
Choose the Pay Now layout
Open: ![]() Tools > Choose layouts.
Tools > Choose layouts.
-
Add the correct layout.
- Choose StatementPrimaryEmail or StatementAlternateEmail from the Layout drop-down list.
- Click the ... button (
 ) and choose default > layouts > Sales Ledger Statement Payment Service Provider (E-mail).layout and click Open.
 - Click OK.
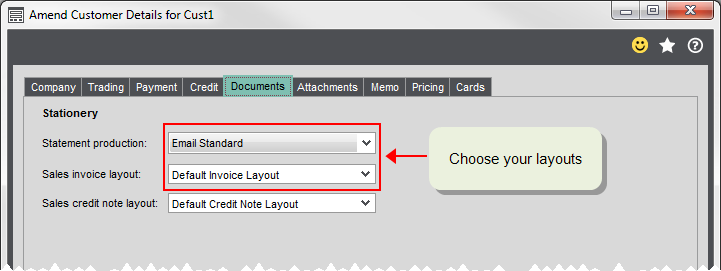
Make sure your customer accounts are using the correct email statement layout:
Open: Customer list > Amend Account | Documents
- Choose Email Standard or Email Alternate from the Statement Production drop-down list.
Produce email statements
When you run your statements, you must make sure you email them to your customers. To do this:
Open: Customer List > Reports > Run statements.
-
Choose Run statements to email and printer.
Your statements are produced and sent to any customers that are set to use email statements.
Use Pay Now button with invoices
Sage 200 allows you to use multiple invoice layouts so you can use different layouts for different customers.
Use the Pay Now layout for all customers
Open: ![]() Tools > Choose layouts.
Tools > Choose layouts.
- Choose SOP Invoice from the Layout drop-down list.
- Click the ... button () and choose default > layouts > SOP Invoice Payment Service Provider (E-Mail).layout and click Open.
- Click OK.
Use the Pay Now layout as an additional layout
If you want to use more than one layout, you must add the new layout to Sage 200 first and then select the layout each customer account will use. All customers are set to use the default layout, by default.
To add the layout to Sage 200:
Open: Settings > Sales Orders > Maintain Invoice Layouts.
- Click Add.
- Click the ... button () and choose default > layouts > SOP Invoice Payment Service Provider (E-Mail).layout and click Open.
- If you want this to be the default layout for all customer accounts, click Default.
To add the layout to a customer account
Open: Customer list > Amend Account | Documents.
- Choose the layout you've just added above from the Sales invoice layout drop-down list.
- Click Save.
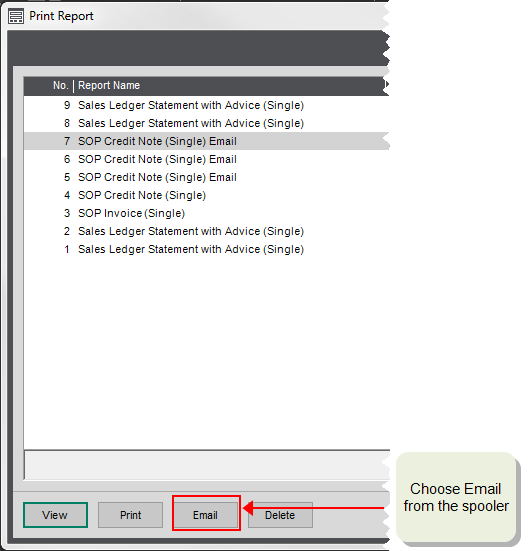
Email invoices to your customers
-
Set the Output mode to Spooler or Preview.
How to do thisOpen:
 Tools > Choose Output Mode.
 - Make sure each customer account has a contact with a valid email address.
- Print your invoices: Choose Print from the Sales Orders list or Sales orders > Printing > Print invoices.
-
Choose Email from the preview or the spooler.
Use Pay Now on pro formas
Choose the Pay Now layout
Open: ![]() Tools > Choose layouts.
Tools > Choose layouts.
- Choose SOP Proforma from the Layout drop-down list.
- Click the ... button () and choose default > layouts > SOP Pro Forma Payment Service Provider (E-Mail).layout and click Open.
- Click OK.
Email pro formas to your customers
- Make sure the contact on your customer account has a valid email address.
-
Set your Output mode to Spooler or Preview.
See how to do thisOpen:
Tools > Choose output mode.- Choose Preview or Spooler.
- Print the pro formas and click email from the spooler or preview screens.
Use Pay Now on Debtor Letters
The number of debtor letters you need usually depends on the number of ageing periods you use. You can have up to eight ageing periods and therefore up to 8 different debtor letters.
We provide four 'out of the box' variants of debtor letter both with and without a Pay Now button.
If you want to use your own letters, we recommend that your copy and edit one of these default letters that already contain the Pay Now button. You save the edited letters in the custom > letters or company > letters folder.
Choose the Pay Now layout
Open: ![]() Tools > Choose layouts.
Tools > Choose layouts.
- Choose the relevant letter for each of your aged debt periods from the Layout drop-down list, e.g. Debtor Letter Period 1
- Click the ... button () and choose the relevant letter from default > letters folder, such as Sales Ledger Debtors Letter 1 Payment Service Provider (E-Mail).letter, then select Open.
- Click OK.
Email letters to your customers
- Make sure the contact on your customer account has a valid email address.
-
Set your Output mode to Spooler or Preview.
See how to do thisOpen:
Tools > Choose output mode.- Choose Preview or Spooler.
- Print the letters and click email from the spooler or preview screens.
Add the Pay Now button to your own custom layouts
If you want to use the Pay Now button on your custom layouts, we recommend that you customise the layout that we've provided to suit your needs.
If you want to add the Pay Now button to an existing invoice layout, see Add a Pay Now button to custom invoices.
Useful info
About Opayo
Opayo (formerly Sage Pay) is an online card service provider similar to PayPal. Opayo integrates seamlessly with Sage 200 making it easier for your customers to pay you and easier for you to process those payments.
Once you've subscribed and integrated Opayo with Sage 200, you can:
- Take card payments from your customers and input them directly into Sage 200. This is useful when a customer pays you over the phone.
- Add Pay Now buttons to invoices, statements and debtor letters, so your customers can pay you immediately. Your customer just clicks the button and enters their card details.
- Import payments made using the Pay Now option, directly into Sage 200.
About using Pay Now
Pay Now with Opayo is a great way for your customers to pay you online, quickly and easily. We have provided some standard layouts for invoices, statements and chase letters which contain a Pay Now button for use with Opayo. This means when your customer receives your invoice, letter or statement, they can pay you straight away by clicking Pay Now.
Note: You can't use Pay Now for foreign currency invoices.
In addition you can import a payments made using the Pay Now button directly into Sage 200, and where possible, they are automatically allocated to the invoices they're paying.
The Pay Now button is available on the following invoice, letter, and statement layouts that we've provided for you. If required, you can also add a Pay Now button to your own customised layouts.
-
Sales Ledger Statement Payment Service Provider (E-mail)
-
SOP Invoice Payment Service Provider (E-mail)
-
SOP Pro Forma Payment Service Provider (E-Mail)
-
Sales Ledger Debtors Letter 1 Payment Service Provider (E-Mail)
-
Sales Ledger Debtors Letter 2 Payment Service Provider (E-Mail)
-
Sales Ledger Debtors Letter 3 Payment Service Provider (E-Mail)
-
Sales Ledger Debtors Letter 4 Payment Service Provider (E-Mail)
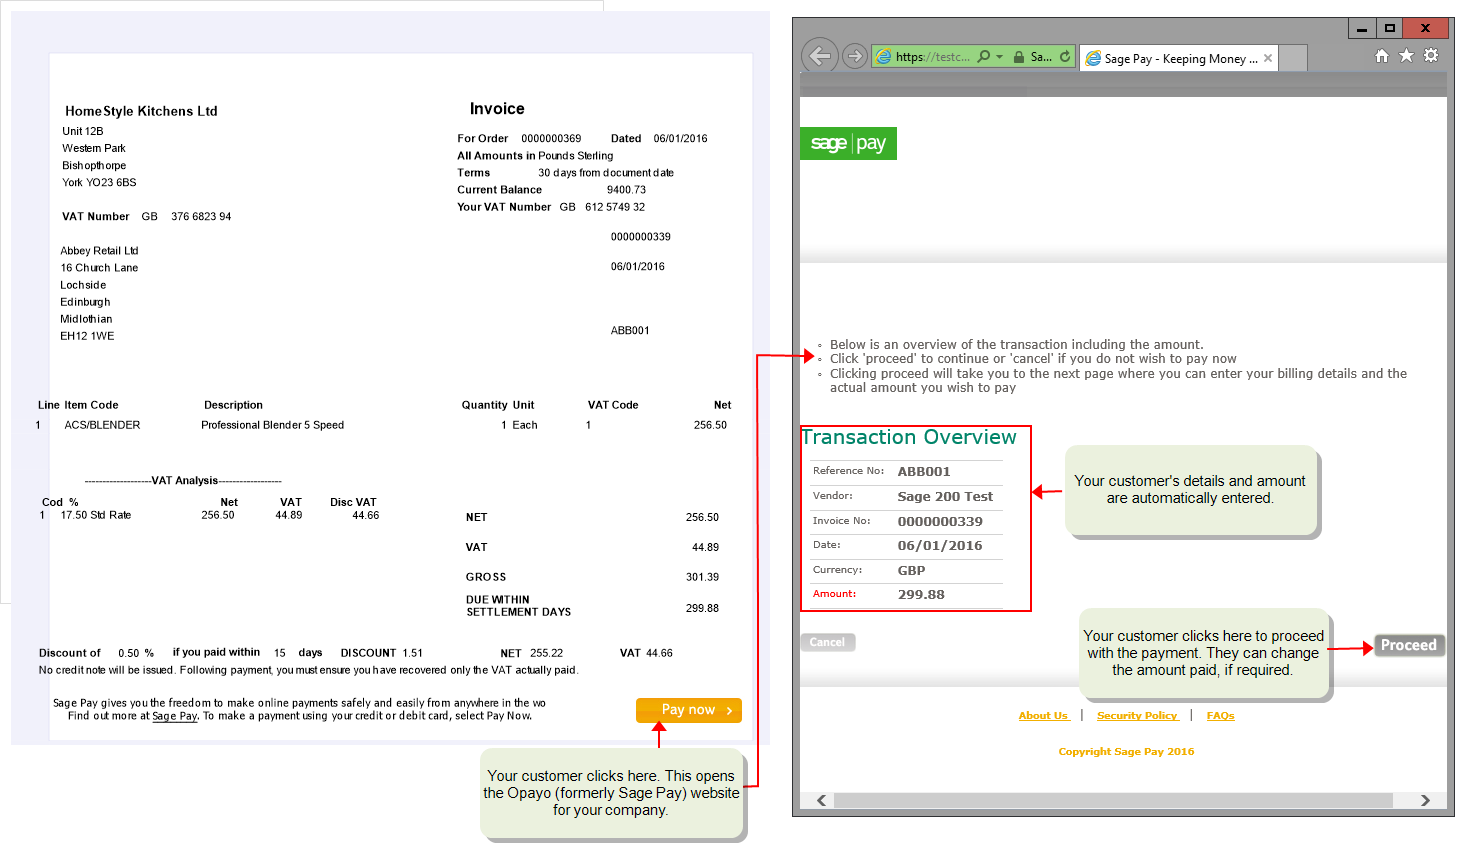
How the Pay Now button works
The Pay Now button is an embedded image on your layout. It contains an expression which uses a special Sage 200 Pay Now function. This function links to the Opayo website, when your customer clicks the image. The expression also contains other information which is passed through to the Opayo website, such as your Opayo Vendor account name, your customer's account code, the amount to pay, date, and invoice number. The expression varies depending on the type of document. Although the expression appears in plain text in Report Designer, it's encrypted on your documents.
When the Pay Now button doesn't appear on your documents
The Pay Now button won't be appear in certain circumstances. These are:
- When Opayo hasn't been configured in Sage 200.
- For any foreign currency customers. This is because the Pay Now button is not supported with foreign currency.
- For any amounts over £100,000. This is maximum payment that can be made via Opayo.
- When an invoice doesn't have an outstanding balance. For example, it was paid when the order was entered or another receipt has been allocated in full or part.
- On an statement, when the customer account is either in credit or has a zero balance.
Fix it
The Pay Now button is not appearing on my documents
- Check that the button isn't excluded for one the reasons listed in When the Pay Now button doesn't appear on your documents.
- Check that you're using a layout with a Pay Now button added.
-
For invoices and statements - check that customer account is set to use an invoice layout with a Pay Now button.
- For invoices - check that the correct layout was used when the invoices were printed.
What happens when
My customer clicks Pay Now
The secure link takes them to the Opayo website for your company. Their company details and the amount are automatically completed, although they can change the amount they choose to pay. They simply enter their card details and the payment is processed.
Sage is providing this article for organisations to use for general guidance. Sage works hard to ensure the information is correct at the time of publication and strives to keep all supplied information up-to-date and accurate, but makes no representations or warranties of any kind—express or implied—about the ongoing accuracy, reliability, suitability, or completeness of the information provided.
The information contained within this article is not intended to be a substitute for professional advice. Sage assumes no responsibility for any action taken on the basis of the article. Any reliance you place on the information contained within the article is at your own risk. In using the article, you agree that Sage is not liable for any loss or damage whatsoever, including without limitation, any direct, indirect, consequential or incidental loss or damage, arising out of, or in connection with, the use of this information.